
In Data Analytics server we can deploy a custom theme using a carbon archive file. so we can select a custom theme for each dashboard out of these deployed custom themes. (If we don’t want a custom theme, can use the default theme)
Here in this post I will provide high level instructions for change the look and feel of Dashboards.
When you are Log into the Analytics Dashboard and opens create dashboard icon you will navigate to create dashboard page. In there you will see a option call “theme”(figure 1.0) you will notice there are no options default theme is the only available theme, but when you create your own themes you could able to see those themes in there and can apply them accordingly when you are about to create dashboard.
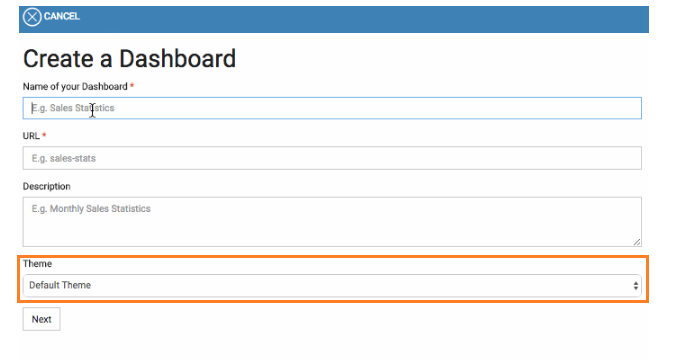 |
| Figure 1.0 |
Please note through this feature, you are allowed to add a
custom theme only for the view of the dashboard. you can add your own script
files, template files and styles to customize the view of a particular dashboard
accordingly.
Here are the steps that you have to carry out
Step 01
Create a custom theme
file
When it is a creating
custom theme you need to maintain folder structure as follows(figure 2.0).
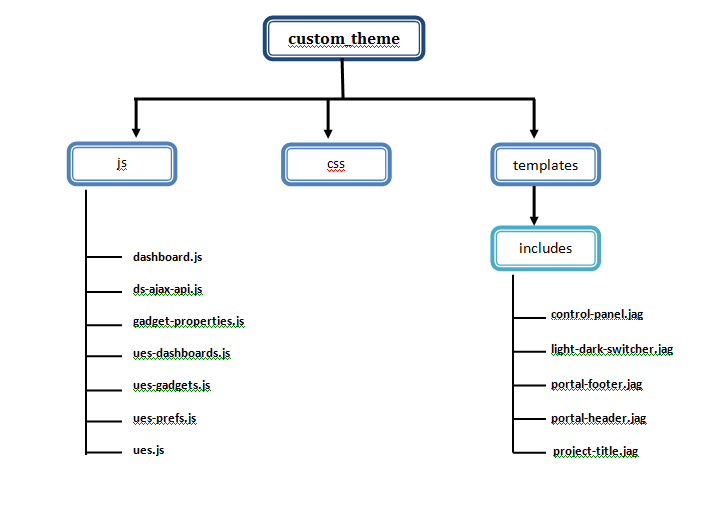 |
| figure 2.0 |
You might be confused where could I find these jaggery files J no worries You can find the JavaScript files by
navigating through
<DAS-HOME>/repository/deployment/server/jaggeryapps/portal/ js
jaggery files(.jag files) you can find on location of
<DAS-HOME>/repository/deployment/server/jaggeryapps/portal/theme/templates/includes
Note:
‘css’ folder
can contain any style sheets with the extension of .css. But the ‘js’ and
‘template’ folders should contain the file naming as defined in the above
structure.
Step 02
As I mentioned in above step you have to create custom them
file (According to my example i named it as “custom_theme”) according to your requirement and from that folder you need to create car
file since custom theme file should be create as a carbon archive file which
has the extension of .car.
While you creating the car file. you have to create car file manually (for creating car file in DAS server there is official documentation published by WSO2 you can find it here )
Please make sure to change the artifact
type of the theme define as ‘dashboards/theme’. For example, the artifact.xml
file for a custom theme is as follows.
<artifact name="custom_theme" version="1.0.0" type="carbon/application">
<dependency artifact="car" version="1.0.0" include="true" serverRole="DataAnalyticsServer"/>
</artifact>
Step 03
Once you have created the carbon archive file for a custom
theme successfully, you can deploy it through the carbon application deployer
in admin console. To do that Log in to WSO2 DAS management console using
admin/admin credentials.
 |
| figure 3.0 |
Click
Main, and then click Add in the Carbon Applications menu Click Choose File and
select the .car file that you created and upload.
Step 04
Then
navigate to the <IP address:port>/portal/dashboards and At the creation of
a dashboard, the user can select the default or custom theme for that dashboard
 |
| figure 4.0 |
you can also change the theme of a dashboard, from the settings view of that
dashboard. Once you select the new theme from the dropdown list, click save
button to save the changes, Once you select or change the theme of a dashboard,
you can use the dashboard view to see a preview of the final dashboard


Thanks for sharing this blog. This blog is helpful to learn about data analytics.
ReplyDeleteData Science Course in Chennai | Data Science Training in Chennai
Thank you Andrew :-)
ReplyDelete